 Figure 1- Main Screen
BUILDING A FLEXIBLE REPORTING SYSTEM TEMPLATE USING DEVELOPER/2000
Joseph Strano and Dr. Paul Dorsey
Dulcian Inc.
Overview
A flexible reporting front-end that allows users to select sorts, breaks and filters dynamically is a powerful addition to any major reporting system, but is usually a very complicated and time consuming application to create, even for the most experienced developer. If the time is spent on creating a template, a flexible reporting front-end application can be created in a day by a novice developer.
In most major reporting systems, there are 10-20 distinct reports with hundreds of variations. The conventional way to build this type of system is to create a report for each variation that the user wants. There are two problems with this approach:
An easier and more efficient method would be to write the 10-20 distinct reports and place lexical parameters in the main queries. Then build a front-end that allows the user to select the sort, break, and filter options they desire. When the user hits the print button, the front-end builds valid SELECT, WHERE, and ORDER BY clauses to fit the choices made by the user. The front-end then passes these clauses to the report using a parameter list, and the report automatically conforms to the user’s selections. An entire article can be written on this method; but this article will focus on the front-end that manages this system. This front-end is the most complicated application our firm has ever built. For this reason, we decided to spend some time and design a template so that a novice developer can build a production-level Flexible Reporting Front-end in a day. This paper will be organized into four sections:
I) Flexible Reporting Front-end Example
This section shows a flexible reporting front-end that was built with the template, and describes how to operate it.
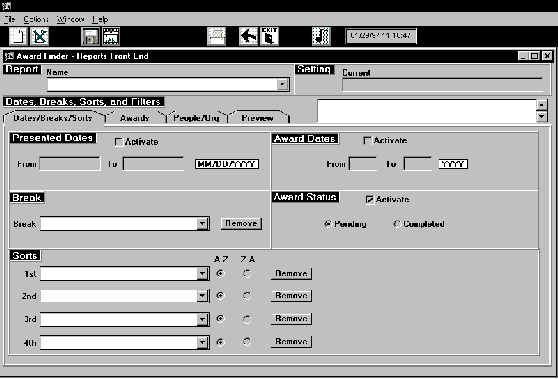
Figure 1- Main Screen
The above screen shot shows the main screen of the Flexible Reporting System front-end.
There are four general areas of this application:
Each will be discussed separately.
1) Breaks/Sorts
The break and sort drop-down lists will be empty until a report is selected.
Once a report is selected, the Break and Sort drop-down lists are populated with the columns that can be sub-totaled or sorted on for the specified report as shown in Figure 2.
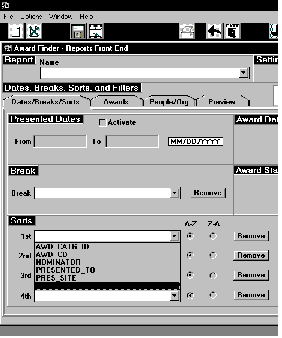 Figure 2 – Breaks and Sorts
If the user selects a different report, the break and sort choices are cleared and the lists are re-populated with the columns that are valid for the chosen report. Error checking is built in so the user cannot select the same sort column twice, nor can they sort on the column they chose as a break. This sort will happen automatically.
Once a sort is chosen, the user can specify that sort to be in Ascending or Descending order.
2) Filters
Figure 3 shows the Awards tab that has four filter blocks on it. Until the user clicks on the Activate check box for the block, the block is ignored.
 Figure 3 – Filter blocks
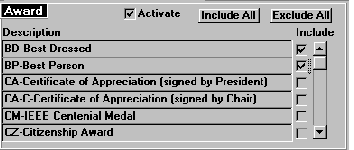 Figure 4 – Choice Setting
Figure 4 the Award block activated and two choices set. If the report were run now, it would only show the records with an award of BD or BP. If the activate button was de-selected, the items in the list would still be selected, but the report wouldn’t filter them.
3) Preview
Figure 5 is an example of the Preview tab using the filter options shown in the previous section. This will show the user what data will appear on the report without having to generate the report.
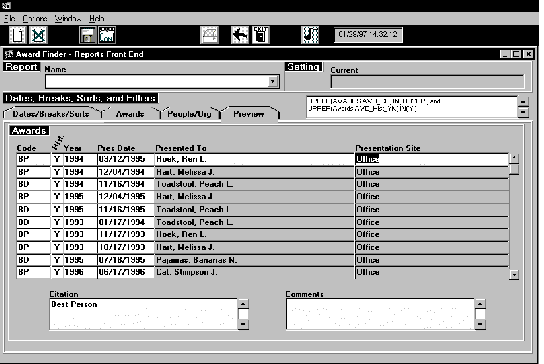 Figure 5 – Preview Tab
Not only does this save the user time by not having to generate a report to find errors, but this application can also double as a finder. The user can double click on any one of these awards, and control switches to the Award Editor with the selected award activated.
4) Saving/Opening Settings
If the user wants to run the report with the same options multiple times, they can save the settings so that they can be recalled with just a click of a button. To save the settings, the user clicks on the Save button (Disk Icon) on the toolbar. The Save window appears showing the user the names that are already in use. The user types in the name they want and clicks on OK. These selections are saved to the database.
 Figure 6 – Save As Dialog Box
To use a saved setting, the user clicks on the Open Setting button (1st button on the toolbar). A dialog box similar to the Save As dialog box shown in Figure 6 appears with the title "Open."
The user clicks on the setting they want, and clicks on OK. The application automatically sets itself up according to the specifications of the setting file.
II) How to Use the Template
This section explains the steps necessary to create a filter block similar to the awards block shown in the previous section. For this example, we will use the EMP table in SCOTT/TIGER. This section was included to show how easy it is to build this application once the template is designed.
The result of the above 13 steps is shown in Figure 7.
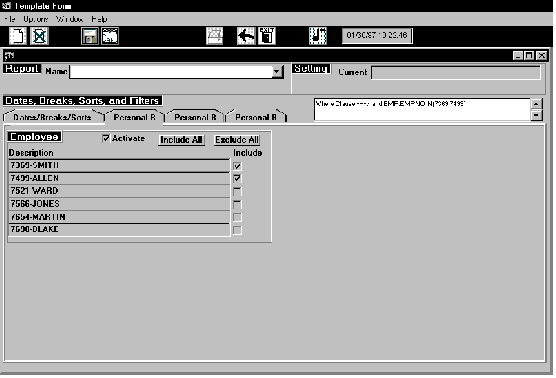 Figure 7 – Filter Block
The Employee filter block is fully functional. The user can activate it, select items from it, and when they run a report, the form will build a valid Where clause for it. Save and Open also work automatically with this new block.
III) Parts of the Template
There are two parts of the template: the object library and the base template.
1) Object Library
Refer to the screen shot in Section I that shows the entire Awards tab. This screen is made up of 5 canvases: The main canvas, which is shown from the tabs on up, the awards canvas, the event canvas, the presentation site canvas, and the conference canvas. Each filter type has its own blocks and canvas associated with it. The object library holds this information in Object Groups. Each Object Group has all of the items necessary for a filter type. Each filter type has a header block that holds the following items:
The three of the most common filter types are: Base Table, Multi-LOV, and Checkboxes.
A) Base Table
A Base Table filter was demonstrated in Section II. The filter values for the blocks are retrieved directly from a database table. The user then selects the checkbox next to the filter value they want. If they want to show all but one, they would click on Include All, then de-select the items they don’t want to show.
B) Multi-LOV
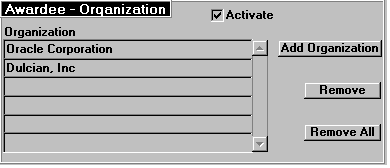 Figure 8 - LOV
When the user clicks on Add Organization, a LOV appears listing all Organizations available. When the user chooses one from the LOV, the value is added to the list as shown here
C) Checkboxes
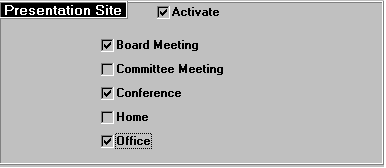 Figure 9 – Checkbox Filter
This type of filter shown in Figure 9 is good for an item that has a small and static number of possible values. This way, a lookup table is not necessary to handle this filter.
2) Base Template
The base template holds all of the code for this application. Without any coding, this form will save, open, and delete settings, and run reports will break, sort, and date filter information. When a filter block is copied in from the object library, the code looks at the LIST_OF_FILTER_BLOCK field in the Stuff Block, and performs all necessary actions on the blocks listed there. Each tab has a WHEN_MOUSE_CLICK trigger attached telling the system which canvases to show when the tab is clicked on. No matter the number or the types of filter blocks the user has, this template will handle them with minor modifications to some block items. No change in any program unit is necessary.
IV) Code
This section will show the code behind some of the more important programs units needed to make this application work.
1) P_Update_Global
All filter blocks have two parameters associated with them:
Both of these parameters store these values in a comma-delimited list. Each time the user changes the items they have selected for a particular block, this procedure is called to update the two parameters.
| Code | Comments |
| PROCEDURE p_update_global(name_block varchar2,in_value varchar2,in_desc varchar2,in_choice varchar2,in_type varchar2) IS | Name_Block – The name of
the block
In_Value – The value that is to be added or deleted from the list in stored in PARM. In_Desc – The description that is to be added or deleted from the list stored in DESC_PARAM. In_Choice – Y if item is to be added, N if item is to be deleted. In_Type – Whether the datatype of the ID is number or char. |
| :local_list := null;
copy(Name_IN(name_block || '_Header.param'),'local_list'); :local_desc_list := null; copy(Name_IN(name_block || '_Header.desc_param'),'local_desc_list'); |
Copy the Param and Desc_Param fields into bind variables. |
| If In_Choice = 'Y' and In_Type =
'NUMBER' Then
listx.add_to_list(:local_list,in_value); |
If the ID is to be added to the list, and it is of type NUMBER, then call the procedure to add it to the end of the list. |
| ElsIf in_Choice = 'Y' then
listx.add_to_list(:local_list,util.quote(in_value)); |
If the ID is to be added to the list, and it’s datatype is NOT number, then add it to the list surrounded by quotes. |
| Else
If in_type = 'NUMBER' Then Status_Delete := listx.del_from_list(:local_list,in_value); Else Status_Delete := listx.del_from_list(:local_list,util.quote(in_value)); end if; End If; |
If the item is to be deleted from the list, call the Delete function placing quotes where appropriate. |
| copy(Name_IN('local_list'),name_block || '_Header.param'); | Copy the list back to PARAM. |
| If In_Choice = 'Y' Then
listx.add_to_list(:local_desc_list,in_desc); Else status_delete := listx.del_from_list(:local_desc_list,in_desc); End If;
copy(Name_IN('local_desc_list'),name_block || '_Header.desc_param'); |
Do the same for DESC_PARAM, but here we don’t care about the datatype. We either want to add or delete the description from the list, then copy it back to DESC_PARAM. |
2) K_Save_Filter Package
This package holds the procedures needed to save the settings the user made to the database. The procedure that will be discussed here is the Base_Table procedure. This will be used for all base table filter blocks.
| Code | Comments |
| PROCEDURE base_table(name_block varchar2,name_id varchar2,name_filter varchar2,name_activate varchar2) IS | Name_Block – The name of
the block
Name_ID – The name of the ID field for this block. Name_Filter – The name of the filter field for this block. Name_Activate – The name of the activate field for this block. |
| cur_rec number(5); | Stores the top most visible record of the block before any processing is done. |
| pu_insert_data(Name_In(Name_Activate),'SCREEN_VARIABLE',NULL,name_activate); | Store the value of the activate check box for the block. |
| go_block(name_block);
cur_rec := get_block_property(name_block,TOP_RECORD); |
Store the top most visible record of the block. |
| first_record;
copy(NAME_IN(name_block || '.' || name_id),'stuff.id_value'); copy(NAME_IN(name_block || '.' || name_filter),'stuff.filter_value'); |
Go to the first record of the block and copy the ID value into STUFF.ID_VALUE and the Filter into STUFF.FITLER_VALUE. |
| While :Stuff.ID_Value Is Not Null Loop | Execute the loop until we reach the end of the block. |
| If :Stuff.Filter_value = 'Y' Then
pu_insert_data(:Stuff.ID_Value,NULL,'Y',Name_Block); End If; |
If the user selected the value, store it in the database. |
| Next_Record;
copy(NAME_IN(name_block || '.' || name_id),'stuff.id_value'); copy(NAME_IN(name_block || '.' || name_filter),'stuff.filter_value'); End Loop; |
Go to the next record of the block, copy the ID and filter values and re-check the While loop. Essentially, we are walking the block. ???? |
| Go_Record(Cur_Rec); | Go to the record that was originally displayed at the top of the block. |
3) F_Build_Where
This function will build a valid Where clause for a block that is based on a character ID.
| Code | Comments |
| FUNCTION f_build_where(In_Param Varchar2,Name_PK Varchar2,In_Where Varchar2,Calling_From Varchar2) RETURN Varchar2 IS | In_Param – The value of
PARAM for the block.
Name_PK – The value of COLUMN for the block. In_Where – The where clause that has been built already. Calling_From – REPORT – Will be used in a report. FORM – Will be used for the Preview tab. |
| If In_Where is null then | If the where clause hasn’t been started yet… |
| If Calling_From = 'REPORT' Then
Where_String := ' and UPPER(' || Name_PK || ') IN(' || Util.Quote(Name_In(In_Param)) || ')'; |
If this is to be used in a report, start the clause with <SPACE> and. Util.Quote places a set of quotes around the list stored in PARAM. Necessary because Oracle automatically strips a set of quotes off of a passed parameter. |
| Else
Where_String := 'UPPER(' || Name_PK || ') IN(' || Name_In(In_Param) || ')'; End If; |
If this is to be used on the preview tab, leave off the "and" at the beginning of the clause. |
| Else
If Calling_From = 'REPORT' Then Where_String := In_Where || ' and UPPER(' || Name_PK || ') IN(' || Util.Quote(Name_In(In_Param)) || ')'; Else Where_String := In_Where || ' and UPPER(' || Name_PK || ') IN(' || Name_In(In_Param) || ')'; End If; End If; |
If the Where clause has been started already, tack the new clause to the end of it. |
A similar function was built to handle numeric ID’s called F_Build_Where_Num. This function will not be shown here.
Conclusion
With this template, hard coding sorts, breaks, and filters into reports is a thing of the past. Not only does using lexical parameters greatly reduce the number of reports that need to be designed, using the template cuts the design and build time of the front-end to manage it all from a month to a day.