JDeveloper JSP Development Best Practices:
Thick Databases Illustrated
Dr. Paul Dorsey, Dulcian, Inc.
Roger Dorsey, DRND, Inc.
The process of building a scalable and maintainable web application has many tradeoffs to consider. No single approach can handle all of the possible situations. However, after a few years of implementing small, medium and large web applications, several best practices have emerged.
The most important of these is to move as much code as possible into the database. This is a difficult transition for most experienced application programmers to make. Historically, applications have been built with tools that coded a great deal of complexity into the client-end. This approach embraces an architecture that views the database as nothing more than a set of tables to hold information. The complex set of rules for modifying data would be entirely handled by the client application. Now, with browser-based, internet applications this approach is no longer appropriate. The current thinking is based around the phrase “thin-client,” which can be leveraged to the point that nearly all data collection, validation, navigation, and error handling is performed in the database.

Figure 1: Data update and
validation path
Consider building a simple application that attempts to update a single record. During the update process, the client code would only capture and submit the information the user wishes to update. The remainder of the validation and logic for correctly applying the updates would be handled with code in the database. If the database validation fails, a custom error message is sent back with information that will direct the client to re-display the update record page. If the validation succeeds, the database directs the client code to a Success Page as shown in Figure 1.
The majority of the work required to build this simple web
application will be in the creation of the appropriate database objects. When the database is complete, the remaining
work is equally divided between the middle tier (
For this training session, you will do the following:
1. Analyze a set of business rules to display information for a given employee.
2. Update the manager to whom the employee reports by selecting one of the managers in the list-of-values (LOV).
The completed application will look something like Figure 2.

Figure 2: Sample
Employee/Manager Application
I. Exploring the Human Resource (HR) schema
The application you will build will be based on Oracle’s sample HR schema, plus a few additions.
The HR schema tables shown in Figure 3 have been created to
store simple business organizational information. The schema has implemented a number of
hierarchical relationships between the objects stored in these tables using
traditional database constraints. You
can examine the REGIONS table shown in Figure 4 by selecting Tools/SQL
Worksheet and typing in the statement shown in Figure 4.

Figure 3: HR Schema Tables

Figure 4: HR Schema
Regions Table
The COUNTRIES table shown in Figure 5 is a child of the REGIONS table. Notice the Foreign Key (FK) column for the parent table on the right (REGION_ID).

Figure 5: HR Schema
Countries Table
Going to the next levels, the LOCATIONS, DEPARTMENTS and EMPLOYEES tables are shown in Figures 6, 7 and 8.

Figure
6: HR Schema Locations Table

Figure 7: HR Schema Departments Table

Figure 8: HR Schema Employees Table
Another hierarchical relationship has the JOBS table at the top as shown in Figure 9.
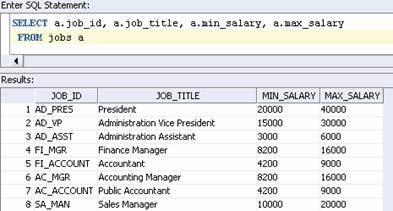
Figure 9: HR Schema Jobs Table
Since employees can have many jobs, and the same job title
may be held by many employees, you will need an intersection table to capture
the many-to-many relationship between EMPLOYEES and JOBS. Thus a

Figure 10: HR Schema Job
History Table
Looking a little deeper at the actual data in these tables, you may discover a few surprises. Try the following: Collect the Manager IDs that are currently assigned in the EMPLOYEES table as shown in Figure 11.

Figure 11: Manager IDs
Next add

Figure 12: Manager Names
Look the Shipping Dept (

Figure 13: Data in the HR
Schema
The following are the business rules for changing the manager
to whom an employee reports:
a) An
organization that allows for multiple managers in each department (or no
manager at all)
b) Employees
may report to any of the managers within the department. (Employees who are acting as Managers, report
to a manager in another department)
c) Only
the President may have a null manager_id.
d) Employees
may be managed by a non-manager.
When building your business logic to support updating an employee’s manager, you will need to take these business rules into account. Also, additional database objects will be needed to give the end user appropriate feedback when they select an inappropriate manager.
The following exercises will guide you through the process of
implementing the business rules above using the HR Schema.
II.
Building the application
In this section, you will learn how to build a simple application using JDeveloper.
Database
The following items needed to be added to the database in
order to support the proposed architecture of housing all of the validation and
complex logic to update a single column in the database.
Implement a database View
with a multi-table join that represents “Page One” in the application. (Just use the
3. Create an INSTEAD OF trigger on the database view, to update the underlying table.
4. Create a database table to hold custom error messages.
5. Create a database package to hold package variables that store the current error.
6. Create a database one-row view to expose custom error messages.
7. Create a JUNK table for debugging.
8. Create a Sequence Counter to populate ORDER_NR in the JUNK table.
9. Create an autonomous_transaction Procedure to populate the JUNK table.
1. Create an INSTEAD OF Trigger
INSTEAD-OF Trigger on “PageOne” View (Emp_Details_View)
CREATE OR REPLACE TRIGGER t_iu_emp_details_view
INSTEAD OF
UPDATE
ON emp_details_view
REFERENCING NEW AS NEW OLD AS OLD
declare
current_exception_Id
number;
old_mgr_job_Id varchar2(10);
new_mgr_Job_id varchar2(10);
--cursor to get custom error message
cursor current_Exception_info(cin_current_exception_Id
NUMBER) is
select exception_CD from brim_exception
where exception_id
= cin_current_exception_Id;
current_exception_CD_Row
current_Exception_info%ROWTYPE;
--cursor to get job_id for old manager
cursor old_manager_Info is
select job_Id from employees
where employee_id
= :old.manager_id;
old_job_id_Row old_manager_Info%ROWTYPE;
--cursor to get job_id for new manager
cursor new_manager_Info is
select job_Id from employees
where employee_id
= :new.manager_id;
new_job_id_Row new_manager_Info%ROWTYPE;
--Now check for updates,
--then apply logic to either update, or throw error
messages
Begin
if updating ('manager_id') then
--Capture Debug
Information
--p_junkauton('employee_id=
'||:old.employee_id||
-- ',
oldmanager_id= '||:old.manager_id||
-- ',
newmanager_id= '|| :new.manager_id);
--check rules
--get job_id for old
manager
open old_manager_Info;
fetch old_manager_Info into old_job_id_Row;
close old_manager_Info;
--get job_id for new manger
open new_manager_Info;
fetch new_manager_Info into new_job_id_Row;
close new_manager_Info;
--first rule: special case of Deceased managerId =176
if :new.manager_id = 176 then --managerId =176
Taylor, Jonathon
current_exception_Id
:= 20;--Error: This manager is deceased
--else test: if old manager job_id is different from new
manager job_id
elsif nvl(nvl(old_job_id_Row.job_Id,new_job_id_Row.job_Id),'zasdfg') =
nvl(nvl(new_job_id_Row.job_Id, old_job_id_Row.job_Id) ,'zasdfg') then
--if same no error
current_exception_Id
:= -1;
else -- if different
create error message
--Error: the
manager you have selected is in a different area.
current_exception_Id
:= 10;
end if;
--Check current_exception_Id for error (not equal to -1)
if ( current_exception_Id != -1) then
--cursor to get custom error message
open current_Exception_info(current_exception_Id);
fetch current_Exception_info into
current_exception_CD_Row;
close current_Exception_info;
--Capture Debug Information
--p_junkauton('current_exception_Id=
'||current_exception_Id||
-- ',
current_exception_CD_Row.exception_CD= '||
--
current_exception_CD_Row.exception_CD );
-- now update
package variables that brim_error_view is based
dml_error.setmessage(10, current_exception_CD_Row.exception_CD);
else
-- no rules broken proceed with update
update employees set manager_id = :new.manager_id
where employee_id
= :old.employee_id;
--clear any error message
dml_error.clearmessage;
end if;
end if;
END;
2. Create a database table to hold custom error messages when
validation fails
CREATE TABLE brim_exception
(exception_id NUMBER NOT NULL,
exception_cd VARCHAR2(200) NOT
NULL,
descr_tx VARCHAR2(2000))
/

3. Create a database package to hold package variables that store
the current error
CREATE OR REPLACE
PACKAGE dml_error
IS
--****************************************************--
--this package handles all
brim exceptions
--*****************************************************--
-- Package Variables to
store the current error message
Id Number;
Message Varchar2(2000);
-- procedures to set and
clear the package variables
procedure SetMessage(NewId Number, NewMessage varchar2);
procedure ClearMessage;
-- functions to get the
current error message
function GetId return Number;
function GetMessage return
Varchar2;
END;
/
CREATE OR REPLACE
PACKAGE BODY dml_error
IS
--****************************************************--
-- Purpose: provide get/set
procedures/functions to access package variables
--****************************************************--
function GetId return Number is
begin
return Id;
end;
function GetMessage return varchar2 is
begin
return Message;
end;
procedure ClearMessage is
begin
Message:=null;
id:=null;
end;
PROCEDURE SetMessage ( NewId IN Number,
NewMessage IN varchar2)
IS
BEGIN
Id :=NewId;
Message := NewMessage;
EXCEPTION
WHEN OTHERS THEN
null ;
END;
END;
/
4. Create a database
create or replace
view brim_error_view (
code,
message )
AS
select dml_error.getid
Id,
dml_error.getmessage Message
from dual
5. Create a JUNK table for debugging purposes:
-- sequence counter for JUNK
CREATE
SEQUENCE junk_seq
INCREMENT BY 1
START WITH 101
MINVALUE 1
MAXVALUE 999999999999999999999999999
NOCYCLE
ORDER
CACHE 20
/
-- create table for JUNK
CREATE
TABLE junk
(junk VARCHAR2(4000),
creat_dt DATE DEFAULT sysdate,
order_nr NUMBER DEFAULT 0
)
/
-- Triggers for JUNK
CREATE
OR REPLACE TRIGGER ui_junk
BEFORE
INSERT
ON junk
REFERENCING
NEW AS NEW OLD AS OLD
FOR EACH ROW
begin
select junk_seq.nextval
into :new.order_nr
from dual;
end;
An autonomous_transaction Procedure to populate the JUNK table:
CREATE
OR REPLACE
PROCEDURE
p_junkauton
(in_tx varchar)
is
PRAGMA AUTONOMOUS_TRANSACTION;
begin
insert into junk
(junk) values(in_tx);
commit;
END; -- Procedure
/
NOTE: You can now add the P_junkauton() procedure in any of
your database PL/SQL. This allows you to
capture debug data even if an exception is thrown, due to the
autonomous_transaction and associated inner commit. The sequence counter populating the order_nr
guaranties that you can put P_junkauton() in several places and still tell
which piece of code executes first.
The following code could be included in the trigger used above as an aid to debugging.
--Capture Debug Information
p_junkauton('employee_id= '||:old.employee_id||
', oldmanager_id= '||:old.manager_id||
', newmanager_id= '|| :new.manager_id);
This screenshot shows an example of the debugging information
that would be placed in the Junk table to view old and new values.

II. Working
with JDeveloper Middle
The following is a
summary of steps that you will use to explore JDeveloper and build a simple web
application module. Each step is explained in more detail with screen shots
showing what you should see as you complete each one.
A. Create a database connection (Username: dulcian Password: oracle).
B. Create a new Application Workspace based on the Web Application (default) template.
C.
Build
· Custom error messages (BrimErrorView)
· List-Of-Values (LOV) to update a given field on “PageOne” (MgrLOVView)
D.
Build
· Point to the custom database View for “PageOne” (PageOneEmpDetailsView)
E. Build ADF BC ApplicationModule to:
·
Expose
· Expose custom java code in the AppModuleImpl.java to the client. (getBrimErrorMessage)
A. Create a database connection
1. Select the Connections tab of the Navigator. If it is not visible, select View | Connection Navigator from the menu.
2. Right-click the Database node and select New Database Connection. If the Create Database Connection - Welcome page appears, click Next.
3. On the Type page of the Create Database Connection wizard, enter “dulcian” for the Connection Name. Leave the Connection Type on the default setting - Oracle (JDBC). Click Next.
4. On the Authentication page, enter “dulcian” as the Username and “oracle” as the password. Leave the Role field blank. Check the Deploy Password checkbox as shown in Figure 14. Click Next.

Figure 14: Connection
Manager Authentication page
5. On
the Connection page, leave the default settings (thin, localhost, 1521,
6. On the Test page, click the Test Connection button. A “Success!” message should appear in the Status window. Click Finish. You will see the new connection listed in the Navigator. If it doesn’t, go back and check the previous steps.
B. Build an application workspace based on the Web Application Template
1. Click the Applications Navigator tab. If it is not visible, select View|Application Navigator from the menu.
2. Right-click the Applications node and select New Application.
3.
Fill in the Application Name as shown in Figure 15
and select Web Application [JSP, Struts,
4.
NOTE: The Application
Template contains default projects that are oriented toward a certain
technology such as Struts. The template affects what options and objects are
available by default for use in the projects. Almost all of the lists in 10g
are context-sensitive, so inappropriate options are rarely available.

Figure 15: Create Application dialog
You will now see _JSP_Struts_HR_DeptEmpView_IOUG in the Applications Navigator along with the Model and ViewController nodes created as part of the Web Application template.
NOTE: When items in
the Navigator are shown in italics, this means that they have not been built
(compiled). When you click either the Make or Rebuild icons on the toolbar, the
italics will disappear. This is a handy way to tell when something in
JDeveloper has been changed since any “unbuilt” items will show in italics.
C. Build
The next step is to create the view objects needed for this
simple application. There are two basic ways to build
1. Create Business Components
The first step is to create the business components needed for the application.
a) To create the appropriate view objects, right click the Model node in the Applications - Navigator and select New.
b) In the New Gallery, select the ADF Business Components category (under Business Tier) and Business Components from Tables from the Items list as shown in Figure 16. Click OK.

Figure 16: New Gallery
c) When the Initialize Business Components Project dialog appears, make sure that the new database connection (dulcian) you created earlier appears in the pulldown. Leave the other settings and click OK.
d) The Create Business Components from Tables Welcome page will appear. Click Next.
e) On
Step 1, of the Wizard, Entity Objects, if necessary, uncheck the Tables checkbox
and check the Views checkbox. If the Auto-Query checkbox is unchecked, you will
need to press the Query button to see the available views. You should see BRIM_ERROR_VIEW
and
f)
Select
g) On the Updateable View Objects page, select PageOneEmpDetailsView and click the right arrow to move it to the selected window. Click Next.
h) On the Read-Only View Objects page, ensure that the Tables checkbox is unchecked and that the Views checkbox is checked as shown in Figure 17. If you have checked the Auto-Query checkbox on this dialog, JDeveloper automatically read the database to present the database objects; otherwise they may not appear immediately. Select BRIM_ERROR_VIEW and click the right arrow to move it to the Selected window. Note that JDeveloper adds an additional “View” suffix to the name. In the View Name Field, delete the extra “View” as shown in Figure 17. Click Next.

Figure 17: Selecting Read-Only View Objects
i) On the Application Module page, leave the default settings and click Next. Since this is the first time you used the Business Components from Tables wizard, you are able to create and populate the Application Module. Later you will clean up the code that is generated, and add the rest of the objects needed for the user interface code.
j)
Click Next on the Diagram page.
k) You can review your selections on the Finish page and go Back if needed. Otherwise, click Finish. You will see the additions in the Navigator which should look like Figure 18. Click the Rebuild button to compile the code.
NOTE: By default, JDeveloper may name the AppModule view object instances with a trailing number such as 1, 2, 3...etc. as shown in the Structure pane in Figure 18. This is not helpful or useful. It is recommended that you delete these extra instances and rename them appropriately to avoid confusion. You will do this in later in the practice.

Figure 18: Application Navigator/Structure pane
l)
Double click BrimErrorView in the Navigator
to open the View Object Editor. Select the Java node. Under ViewRow Class:
BrimErrorViewRowImpl, check the Generate Java File checkbox. Click Apply and
OK.
2. Create a New View Object
The next step is to create a new view object to support the manager LOV.
a) Right-click the top level Model node in the Applications Navigator and select New. Select the ADF Business Components category and the View Object item. Click OK.
b) Click Next if the Welcome page of the Create View Object Wizard appears. Leave the default package name and enter “MgrLOVView” for the Name. Ensure that the “Rows Populated by a SQL Query with” radio button is selected. Select the Read-only Access radio button and click Next.
c) On the SQL Statement page of the Create View Object wizard, manually add the following query in the Query Statement window:
SELECT
a.employee_id, job_ID ||' '||
a.last_name ||',
'||a.first_name AS mgr_name
FROM employees a
WHERE a.employee_id in(
SELECT 176 as manager_id FROM
dual
UNION ALL
SELECT DISTINCT
emp.manager_id
FROM employees emp)
d) It is a good idea to click the Test button to test your code. You should receive a “Query is valid” message. Click OK and Next.
e) Accept
the default settings on the Bind Variables page and click Next.
f) Review the information on the Attribute Mappings page and click Next.
g) Click Next on the Attributes page.
h) On the Attribute Settings page, verify that EmployeeId shows in the Select Attribute pulldown. Ensure that the Queryable and Mapped to Column or SQL checkboxes are checked. The Employee ID must also have the Key Attribute checkbox checked as shown in Figure 19.

Figure 19: Attribute Settings
i) Use the Select Attribute pulldown to select the MgrName attribute. Ensure that the Queryable and Mapped to Column or SQL checkboxes are checked. You do not need to select the Key Attribute checkbox for this attribute. Click Next.
j) Click Next on the Java page and Finish to complete the Create View Object Wizard.
k) Click the Rebuild icon on the toolbar to compile the project. Make sure that the status bar at the bottom of the screen and Messages Log show a successful compilation.
l) If desired, you can use the query above in the JDeveloper SQL Worksheet (Tools | SQL Worksheet) to retrieve the Manager Names for each Employee ID in the HR database as shown in Figure 20.

Figure 20: Retrieving Manager Names
3. Remove extra columns to pass only
a) Double click PageOneEmpDetailsViewView to open the View Object Editor. Click the Attributes node (not the plus sign). In the Selected pane, hold down the Ctrl key and highlight the following unnecessary attributes: JobId, LocationId, CountryId, Salary, CommissionPct, CountryName, and RegionName. Click the left arrow to move these out of the Selected pane. Click Apply and OK.
b) Double click PageOneEmpDetailsView to open the Entity Object Editor. Click the Attributes node (not the plus sign). In the Entity Attributes pane, hold down the Ctrl key and highlight the following unnecessary attributes: JobId, LocationId, CountryId, Salary, CommissionPct, CountryName, RegionName and click the Remove button. You should now have the following entity attributes: EmployeeId, ManagerId, DepartmentId, FirstName, LastName, DepartmentName, JobTitle, City, StateProvince and RowID. Click Apply.
c) If not already expanded, click the plus sign next to the Attributes node. Click the EmployeeId attribute. Check the Primary Key checkbox. Ensure that the Persistent, and Mandatory and Queryable checkboxes are also checked as shown in Figure 21. Click Apply.

Figure 21: Entity Object
Editor
d) Select RowID from the Attributes List and uncheck the Primary Key checkbox to allow you to delete it. Click Apply and OK.
e) Double click PageOneEmpDetailsViewView in the Navigator. Click the RowID attribute in the Selected column and click the left arrow to remove it. Click Apply and OK.
f) Double click PageOneEmpDetailsView in the Navigator. Select the RowID attribute and click the Remove button. Click Apply and OK.
g) Click the Rebuild icon in the toolbar to compile the project.
4. Update the ADF BC Application Module
a) Double click AppModule in the Navigator to access the Application Module Editor. Select the Data Model node.
b) Move all of the items from the Data Model side out of the pane one at a time using the left arrow.
c) Using the right arrow and the Name and Instance Name fields, move and rename the View Objects so that the Application Module Editor Data Model window (right side) looks like Figure 22. You can either rename the object in the Available View Objects side before moving it to the Data Model side or rename the Instance after it is moved to the Data Model side. Click Apply after each name change to save it.

Figure 22: Application
Module Editor
d) Click OK. The Structure pane should look like Figure 23. Click Rebuild to compile the project.

Figure 23: AppModule Structure pane
e) In the AppModule - Structure pane, double click AppModuleImpl.java to access the code editor.
NOTE: AppModuleImpl.java file is where you add custom Java code. This file works with the ADF data bindings to provide you with drag & drop access for your custom code.
f)
To add the following code (methods) at the top
of the AppModuleImpl.java file just below the class declaration: public class
AppModuleImpl extends ApplicationModuleImpl, click after the curly bracket and
press Enter to add a new line. Paste or type in the following code:
public String getBrimErrorMessage()
{
//Clear any previous error
messages
this.getTransaction()
.executeCommand("Begin dml_error.clearmessage(); End;");
//send data down to the database
this.getTransaction().postChanges();
//check for any error messages
this.getBrimErrorView().executeQuery();
if( this.getBrimErrorView().first()!=null &&
((BrimErrorViewRowImpl)this.getBrimErrorView().first())
.getMessage()!=null &&
(((BrimErrorViewRowImpl)this.getBrimErrorView().first())
.getMessage()).length()>0)
{
//refresh clean data from
database
int currentRowIndex = this.getPageOneEmpDetailsViewView()
.getCurrentRowIndex();
this.getPageOneEmpDetailsViewView().executeQuery();
this.getPageOneEmpDetailsViewView().setRangeStart(0);
this.getPageOneEmpDetailsViewView()
.setRangeSize(getPageOneEmpDetailsViewView().getRowCount());
this.getPageOneEmpDetailsViewView()
.setCurrentRowAtRangeIndex(currentRowIndex);
this.getTransaction().commit();
return "isError";
}
//when no errors are found –
return success
return "success";
}
public void setPageOneToEmp125()
{ //get all employee rows
this.getPageOneEmpDetailsViewView().executeQuery();
//set all rows to be in the current “Range”
this.getPageOneEmpDetailsViewView().setRangeStart(0);
this.getPageOneEmpDetailsViewView()
.setRangeSize(getPageOneEmpDetailsViewView().getRowCount());
//for testing - select an employee from the shipping department
this.getPageOneEmpDetailsViewView().setCurrentRowAtRangeIndex(25);
}
g) Click the Rebuild icon to compile the code.
NOTE: If there are errors when you compile the code, they are likely due to a problem with the view names. Check to make sure that the view names in the Navigator match the names in the code.
h) Double click AppModule in the Navigator to access the Application Module Editor. Expose the custom methods by clicking the Client Interface node and moving both of the available methods into the Selected panel using the double arrows. Click Apply and OK.
i) Click the Rebuild icon and make sure that the project compiles with no errors. Close the AppModuleImpl.java window by clicking the X on the tab.
Now you are ready to create the JSP/Struts portion of your application.
Create the Struts
j) Right-click the View Controller node in the Navigator and select Open Struts Page Flow. The Component Palette or the Data Control Palette will be displayed on the right side of the screen (In version 10.1.3 the tabs will be shown on the far right-hand side of the IDE) and the blank diagram will be in the center. If the palettes are not displayed, go to View |Component Palette and select the appropriate one.
k) If necessary, click the Components tab and select Struts Page Flow in the pulldown to display the Struts Page Flow components. Drag an Action component from the Component Palette on to the struts-config.xml diagram.
l) Click the name area and rename it “/startHere”. Press Enter.
m) Click the Components tab again. Add a “Welcome” page by dragging the Page icon on to the diagram. Click in the name area to rename the page “/welcomePage.jsp”. Press Enter.
n) Add a Data Page and rename it “pageOneDP”. Press Enter. This page actually consists of the components shown in Figure 24.

Figure 24: Data Page
components
o) Add another Page and rename it “/successPage.jsp”. Arrange the diagram as shown in Figure 25.

Figure 25: struts-config.xml diagram
p)
You will need to double click each of the
components to create them. Click OK on the Struts Action dialog for the
/startHere Data Action. You will then see the code file in the main window. An
additional tab will be added to the work area. Click the X in the right corner
of the tab header to return to the struts-config.xml diagram.
q)
Double click /pageOneDP. The Create JSP
Wizard will start. Click Next on the Welcome page.
·
On the JSP File page, leave the radio group
default selection and File Name and click Next.
·
On the Error Page Options page, leave the “Do
Not Use and Error Page to Handle Uncaught Exceptions in This File” radio button
selected and click Next.
·
On the Tag Libraries page, select Struts HTML
1.0 and Struts Logic 1.0 libraries and move these to the Selected Libraries
pane using the right arrow. Click Next.
·
On the HTML Options page, click Next and Finish
to complete the wizard.
·
Close the pageOneDP.jsp page by clicking the
right corner X of the page tab.
r)
Double click the welcomePage. Click the X in
the right corner of the page tab to close it.
s)
Double click the successPage. Click the X in
the right corner of the page tab to close it.
1. Add Navigation and custom logic
Use the following steps to add the page navigation and logic to the application.
a) Click Page Link in the Component Palette. Then click the welcomePage and pageOneDP to connect them as shown here:

NOTE: If needed, you can right click on the line and select Straighten Lines to clean up the diagram.
b) Expand
the ViewController, Application Sources, and view nodes in the Applications -
Navigator. Double click the ApplicationResources.properties node to view
ApplicationResources.properties for the Link’s displayed text:
Change “link.pageOneDP=link to
/pageOneDP.do” to “Go to Page 1.” Close the window by clicking the X on the
ApplicationResources.properties tab. Click Yes on the Save Files dialog.
c) On the struts-config.xml diagram, add a Page-Link from the Success page back to PageOne as shown here.
NOTE: You can create nodes in the lines you draw by simply clicking and changing directions as you draw.

d) Add
a DataAction and place it as shown in Figure 26. Rename it /getBrimError. Press
Enter
e) Add a Forward from pageOneDP to getBrimError. Double click the “success” word and rename the Forward “Submit”. Press Enter.
f) Add a Forward from getBrimError to pageOneDP, rename to “isError”. Press Enter.
g) Add a Forward from getBrimError to successPage.jsp, leave name as “success” Your diagram should look something like Figure 26.

Figure 26: Dragging & Dropping from the Data Control Palette
h) Switch from the Component Palette to the Data Control Palette or use View | Data Control Palette to redisplay it. Expand the AppModuleDataControl and Operations nodes. Drag & drop getBrimErrorMessage( ) from the Data Control Palette on top of the /getBrimError data action on the struts-config.xml diagram. You will not see any change in the diagram but you will see additions in the Navigator.
i)
Double-click
/getBrimError to open the ADF PageController dialog. Click OK to create the GetBrimErrorPageController
class. The GetBrimErrorPageController.java file will open.
j)
Place cursor after the
first open bracket following PageController. Select Source | Override Methods from the JDeveloper menu. In the Override
Methods dialog, select the checkbox next to the prepareRender method. Click OK.
You will see the new code added to the
file.
k) Click the + sign next to the import code line (import will
be highlighted in blue). You should see the following:
import
oracle.adf.controller.v2.context.LifecycleContext;
import oracle.adf.controller.v2.lifecycle.PageController;
Add the following import statement under the statement shown
above:
import
oracle.adf.controller.v2.struts.context.StrutsPageLifecycleContext;
l)
Locate the following line in the new code:
super.prepareRender(context);
m) Insert the following code between the above line and the
closing bracket for the prepareRender method:
String
myMethodResult = (String) context.getBindingContainer()
.getOperationBinding("getBrimErrorMessage").getResult();
StrutsPageLifecycleContext myContext = (StrutsPageLifecycleContext)context;
myContext.setActionForward(myMethodResult);
n) Press the Rebuild icon to compile the code. Make sure it
compiles with no errors.
o) Close the GetBrimErrorPageController.java file by clicking
the X on the tab.
p) Click the Components Palette tab and add a DataAction between the startHere dataAction and the welcomePage as shown in Figure 27.
q) Add a Forward from startHere to dataAction1
r) Add a forward from dataAction1 to the welcomePage. The diagram should now look like Figure 27.

Figure 27:
struts-config.xml Diagram
s) Click the Data Control Palette tab. If needed, expand the AppModuleDataControl node. Drag and drop the setPageOneToEmp125( ) operation onto the /dataAction1 component in the struts-config.xml diagram. You will not see any change in the diagram.
t) Click the Rebuild icon to compile the project.
2. Edit the JavaServer Page
You can now edit the Java Server Page you created.
a) Double click /welcomePage.jsp to edit the Welcome page. Click next to the link.pageOneDP marker, press Enter and type “Welcome”. If desired, you can use the pulldowns and other text edit buttons to change the look of the text. For this practice, select Heading 1 from the first pulldown (showing Paragraph). Note the font change.
b) Click the struts-config.xml tab. Double click successPage.jsp, click next to the message link.pageOneDP, press Enter and type “Success!” If desired, you can use the pulldowns and other text edit buttons to change the look of the text. For this practice, drag over the word and click the B to make the text bold.
c) Close both of the JSP pages by clicking the X on each tab. Answer Yes to the Save Files dialog for both.
3. Edit pageOneDP
In this section you will edit the data page.
a) Double click pageOneDP to open the blank page. From the Data Control Palette, if needed, expand the AppModuleDataControl and select PageOneEmpDetailsViewView. Drag and drop the PageOneEmpDetailsViewView onto /pageOneDP.jsp. When the menu appears, select Create>Forms> InputForm. You will see something like this:

b) Add Navigation buttons by selecting PageOneEmpDetailsViewView in the Data Control Palette again and Drag and Drop under the Submit button. When the menu appears, select Create>Forms> Navigation Buttons. Be sure to drop the navigation buttons inside of the red dotted line.
c)
In the Application Navigator, expand the ViewController|Application
Sources| view.pageDefs nodes and select the pageOneDPPageDefs.xml file. Then in
the Structure pane, expand the pageOneDPPageDef|executables nodes and select PageOneEmpDetailsViewViewIterator,
and change the range size to -1 in the Property Inspector. (If the Property
Inspector is not showing, go to View|Property Inspector). Press Enter to save
the change.
4. Construct the ManagerID LOV
a)
In preparation for creating the ManagerID LOV it
is necessary to delete the ManagerID Input Field from the JSP page. Select the
field next to the {$bindings[‘ManagerID’].label} in the pageOneDP.jsp and press
the Delete key. The page should look like this:

b) Expand
the PageOneEmpDetailsViewView node in the Data Control Palette. Select ManagerID
and Drag and Drop As List of Values into the blank cell next to Out-${bindings[‘ManagerId’]
label}. A drop down arrow will appear as shown in Figure 28.

Figure 28: Adding a List of Values (LOV)
5. Edit the ManagerId with the List Binding Editor
a)
In the Application
Navigator, expand the ViewController/Application Sources/view.pageDefs nodes and
select the pageOneDPPageDefs.xml file. Then in the Structure pane, expand the pageOneDPPageDef/
bindings nodes and double-click PageOneEmpDetailsViewViewManagerId to open the
List Binding Editor as shown in Figure 29.
b)
Set the List Data
Source by clicking the Add button on the right, and then select the MgrLOVView
data control. Click OK.
c)
Set the List Items |
Display Attribute to MgrName using the LOV.
d)
Set the “No Selection”
Item: to Include Blank Item. Click OK.

Figure 29: List Binding
Editor
e) On the Data Control Palette, expand the BrimErrorView node. In order to add error feedback to pageOneDP, drag and drop Message as a Value just above EmployeeId as shown in Figure 30.

Figure 30: Adding error
feedback message
f) Change the bindings.Message color to red by selecting it and clicking the color text Icon (the one with the A).
g) Close the pageOneDP.jsp window by selecting the tab and clicking the X. Answer Yes in the Save Files dialog.
h)
In the Application Navigator, expand the
ViewController/Application Sources/view.pageDefs nodes and select the
pageOneDPPageDefs.xml file. In the Structure pane, if not already done, expand the
pageOneDPPageDef | executables nodes and select ManagerLOVViewIterator, and
verify the range size is set to -1 in the Property Inspector.
i) Click the Rebuild icon to compile the application. Make sure there are no errors showing in the Messages window.
IV. Test the Application
You are now ready to test the application.
a) In the struts-config.xml diagram, right click startHere and select Run. The Embedded OC4J Server will start and the messages window will display the progress. Depending upon your setup, this may take some time.
b) The default browser will open to display the Welcome page with a link to the pageOneDP.do. Click the link to display the page shown in Figure 31.

Figure 31: Completed JSP page
c)
Test the application by clicking the First,
Next and Last buttons. You can also view the list of Managers using the
pulldown.
d)
Test the error checking by selecting a
manager from a different department and click the Submit button.