Top 20 Tips and Techniques for Forms 4.5 and 5.0
Dr. Paul Dorsey
Dulcian, Inc.
Used correctly, the Forms component of Developer 2000 is a great product. Unfortunately, for the novice developer, Forms is not a terribly developer-friendly product. My early experiences with Forms 4.5 were traumatic. It seems that every time I tried to do something new, it took me 4-8 hours to figure it out.
Over the last 2 years, I have gotten very comfortable in Forms, and have picked up a few useful tricks. This paper lists the top 20 things I would have wanted to know if I were just starting out in Forms. If you are an experienced Forms 4.5 developer, you will probably have figured out how to do most of these things, or figured out a different (and probably better) way to do the same tasks. I estimate that there about 1000 little tricks you need to know to be a happy Forms developer. This paper will give you your first 20.
Forms coders develop a style over time. This paper represents my style of coding. I don’t pretend that these are the perfect ways to do things. But I will guarantee that they all work and do so with a minimum of hassle.
1) Dynamic pop-lists
Pop-lists are great. They use a minimum of screen real estate and present a cleaner LOV interface to the user that requires even less effort by the developer to create than an LOV. You can control how and when you populate the pop-list and have quite a bit of control over what gets displayed.
There are two ways to dynamically create the pop-list:
A) by population from a record group
B) by creating each row individually in a PL/SQL routine.
The first method is most used, so that is the one I will discuss.
Poplists are most commonly hard-coded. That is, there is a fixed set of values which the poplist displays. These are written into the item in Forms Designer during design time. However, it is possible to load the values based on a query at runtime. This is most appropriate for codes tables and lookup tables with a few rows. It is not always a substitute for LOVs, however, because only one value is displayed.
The most basic method for loading poplists is from a query. It uses a pre-existing record group created in Object Navigator or dynamically at run time.
Example:
The example below will create a poplist of instructor names for the INSTID item in a SECTION block. As with all other poplists, there are 2 identifiers: the display value or element, in this case the Name and the actual table value, in this case the INSTID. Thus, the query needs to have 2 columns in it—one for each identifier. Each row in the query will correspond to one entry in the poplist's "List Elements" area.
Steps:
1. Create a list item as a poplist type.
Item Type: List Item
List Elements: List Element: blank
List Item Value: blank
Other Values: blank
Datatype: Char
Maximum Length: large enough to handle the second column value of the record group query.
2. Widen the list item so it is wide enough to display the first column of the record group query.
3. Create a record group (in Object Navigator). Fill in the query:
SELECT ilname||', '||ifname name, to_char(instid) instid
FROM instruct
ORDER by 1
This will create Column Specifications (in the Record Group properties) of: Name (37 Char) and Instid (Char 40). Note the conversion of the INSTID to character datatype.
4. Add to the WHEN-NEW-FORM-INSTANCE trigger a to fp_item.setup_list to populate the list:
Declare
Status number;
Begin
Status:=populate_group(‘RG_Instruct’);
populate_list (‘INstruct.InstID’, ‘RG.Instruct’);
End;
2) Pop-Lists as Masters in Master Detail Relationships
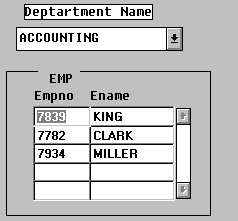
One of the really great things you can do with a pop-list is to use one instead of a master block in a master detail form. For example, you can have an application that looks like the following:
When you change the department name, the EMP block automatically updates. The trick is that you do NOT use a DEPT base table block. The department name list (L_deptno) is a standard list based on a record group with the query:
select dname, to_char(deptno)
from dept
It is populated in the standard way on the WHEN_NEW_FORM_INSTANCE trigger as described in the first tip.
To support the master detail relationship between the pop-list and the block, there is a default WHERE clause on the EMP block of: deptno = :L_deptno. On the list, there is a when_list_changed trigger of:
go_block(‘EMP’);
execute_query;
That is all there is to it. I use this structure a lot.
You can also take the concept one step further and use lists in a master-detail-detail form as both the master and the first detail block. This would support the following kind of application (again using SCOTT/TIGER):
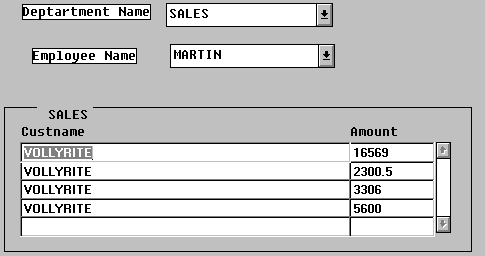
The record group for the Department Name list (L_Dept) is the same as before. The record group for the Employee Name list (L_Empno) filters on :L_deptno. The query is:
select ename, to_char(empno)
from emp
where deptno = :L_deptno
When you change the department list, you want the employee list to update, so you use a WHEN_LIST_CHANGED trigger on the L_deptno list with the following code:
declare
status number;
begin
status := populate_group('rg_emp');
populate_list('l_empno','rg_emp');
end;
The rest of the example is created in the same way as the first example in this tip.
3) Property Classes
More and more people are using property classes. Unfortunately, few people use them very effectively. A property class is simply a list of properties and default values that can be applied to Forms objects. You can have any properties you want in a property class. When you apply a property class to an object, the object simply inherits the properties from the property class.
Most users only use a few property classes in a form. I think I have found a much better way to use them. I set a property class for every object that I will ever use. So, I have property classes for:
enterable text fields in every width I need: 1 character, 2 character, 3,5,10,20,30,40.
non-enterable text fields in all widths
display fields in all widths
enterable numeric fields
non-enterable numeric fields
enterable money fields
non-enterable money fields
buttons, canvases, windows
multi-line fields
Each item has a list of associated properties. Many have appropriate default values.
What happens when an object is assigned to a property class? When selected, every property in that property class will inherit that property's value including instances when the property value is null. This will overwrite any pre-existing values. If necessary, these can be changed back, property by property in the property class.
If a value in a property class is changed and it is necessary to change it back, use the 6th icon - re-inherit (red-red) which will restore the original property class value.
This is often necessary when a block is created that extends beyond the size of the canvas. The height and width of the canvas will automatically adjust to fit the block. Use a right click on the block to check the height and width. If changed, use the re-inherit button to change back to the previous size.
Property classes should be in harmony with the underlying data structure. It is not necessary to have every possible property class. There is a finite number of data domains. The rational methodology is to build a database with property classes that correspond to the data types involved. For example, in CASE, use a property class that corresponds to domains in the database. If all entries are of 5 characters, use a field of length 5.
If you have never made a property class before, consult your documentation. I will assume that you know the basics of how to make and use property classes. First, make an editable text field for a 10 character wide field. Don’t set font or colors individually; instead, use the editable field visual attribute. Run the application to verify that the field is the correct height and width.
Next, create a property class based on the field. Edit the property class and delete inappropriate properties. This first property class will be for all editable fields of ANY width. Then you will make one property class for each field width that is based on this generic editable field property class.
Delete the following properties:
x position
y position
base table item
help text
The idea is to delete all properties that you will likely not want to be overridden if you change your mind about the field. For example, if the field changes from a 5 character code field to a 20 character description field, you don’t want the field turned back into a base table item if you set that property to false so that you can programmatically populate the field.
Next, create a specific property class for the specific field width that you determined earlier. The only additional field for your specific property class is the field width. All other properties are derived from the editable text field property class.
You will need generic property classes for both display and editable fields, for both numbers and text. I actually use two kinds of property classes for display items. One set uses Oracle Display Item. The other uses normal text items. You have more flexibility with text items than with display items. For example, you can’t put a format mask on a display item.
4) GUI Design
There is no industry standard for GUI development. Different companies have radically different standards of how screens should look. Thinking through how screens should be created helps avoid fundamental differences in the way screens will look within the same application. In the older character-based environment, within the same company, there was usually a reasonably consistent look and feel across the character environment. With GUI applications, there are often many applications within one organization that are grossly dissimilar. Determining the type of application helps in determining the approach to setting standards for GUI design. Look and feel standards should be determined for each group.
Applications fall into 5 basic types:
Navigation applications: These include full screen applications (menu) with many buttons. The user clicks on the buttons to move to different parts of the screen. Typically, the first screen that the user sees in the application allows direct navigation to the appropriate place in the application.
Administration applications: There are different choices for handling administration of little code description tables. The table structure for these must be decided upon first. For some developers a clean approach works best with a different table for each code description. However, this approach leads to a greater number of tables. Other developers prefer to combine all of the descriptions in a single table. Choices can then be made about the look of the screen. A good strategy is to have one single administration module (form) that supports the maintenance of all administration. Tables that don’t fit on one screen can be grouped and put on tabs in the same application.
Master-detail applications: A master-detail application is a standard application where there can exist a parent-child relationship between two sets of records. Based upon a current record in the master block, associated detail records are shown in the detail block. Examples include Departments and their associated employees or Purchase Orders (PO’s) and their associated PO details. The master record information can be displayed in a single record block, multi-record block or pop-list. The detail records can be displayed in single or multi-record blocks. The appropriate standards for each parent of master and detail type must be individually considered.
Locator Applications: A very common type of application that allows you to quickly and easily locate a specific record. For example, in a PO system, if you want to find a particular PO, it is very easy if you know the PO number. However, if all that is known is which department initiated the PO and that it occurred in the last two months, Oracle Forms’ query facility is not sophisticated enough to support a query of this type. Therefore, to make it easy for users to locate particular records, it is customary to build a separate application that will help users locate specific records. Such an application has an area at the top of the screen where criteria are set and the bottom half of the screen shows the query results. Double clicking on one of the retrieved records in the locator automatically opens the primary application associated with that record and retrieves that record into the application.
Complex applications: These include applications with a lot of information and contingent fields. The best way to handle these complex forms is with tabs due to the emerging Windows 95 interface standard. Based upon the tab selected, the user can get different stacked canvases. In Forms 5.0, the native tab object will allow editing access to all the tabs, even in design mode. This will be a very useful feature since the developer won’t have to worry about stacked canvases. The one problem with tabs is that they take up a full line that is the height of the tab which can be a waste of screen real estate. A big canvas that scrolls and multiple pages accessed by next page/previous page buttons are alternative ways for handling a large amount of information. These are now considered old style thinking and should be dropped.
For each form, no matter what type, the following decisions need to be made:
What functions should the tool bar have? Handling insert/modification/deletion functions should be available for the user. This should be obvious to the user and consistent on every form. The Designer can assume that users have some training. Nevertheless, the actions should be natural from the user’s point of view. An example of a user unfriendly action may occur when a new record is to be created and the user needs to hit or select something called "clear screen" before inserting information into a new record and saving. This is not logical from a user standpoint since it is not intuitively obvious how to do this. Since the insert function is so common, there should be a button for this function. The user can then click on the insert button. Clicking on this button should prompt the user with an unobtrusive message "Insert record and save" and clear the screen.
There are numerous books on GUI design standards. All recommend keeping colors and fonts to a minimum. These recommendations are boring. However, boring is functional. Many hours can be wasted thinking about appropriate fonts and colors. The best the developer can hope for is that no one hates the choices. It often pays off to make boring selections since various machines with different video boards will display things differently. Different monitors will also affect the displays. The developer should build samples and test them on the client machines with the users.
5) Hardware Requirements
People tend to overestimate how heavy the hardware requirements are for Forms. It’s not as bad as you might think. Even Oracle’s recommendations are overly conservative. Forms is at least as, if not more, resource intensive than other products on the market. Depending upon how forms are done, the hardware requirements may be lower than expected.
I) Requirements for the User/Client:
a) Monitors: The most critical element for the developer is the monitor. It is even more important than the processor, memory, speed or network connection. The monitor is the main productivity enhancement tool in a Forms environment. Forms 4.5 and even more so Forms Version 5.0 (including the Object Library) demand that multiple windows be open at the same time, namely, Object Navigator, Layout Editor, Property Sheets, PL/SQL editor and the Code Reuse Library.
Developers must design the system on a machine with higher resolution than that of the client/user. The Layout Editor alone will use a fixed amount of screen real estate. If building for 800x600 on an 800x600 monitor, it isn’t even possible to get all of the Layout Editor or Object Navigator on the screen at one time. The developer needs a 1024x768 monitor when designing for an 800x600 monitor. A minimally acceptable monitor for a developer is a 1280x1024 on a 21" screen. Recent monitors will support 1600x1200. In this format, the items are very small but the layout will only take up 1/4 of the screen for 800x600 development. This may be worth the eye strain.
A common objection to big monitors is that things will look different or the canvases will be too big. If property classes for GUI standards are set up in advance, this is not a concern.
b) Memory & Machines: The normal recommendation is 16 MB of RAM. This provides a reasonably comfortable environment. The user won’t have to worry about how many forms are open at once, handling graphics, calling reports or running a word processor in the background. In the real world, many users don’t have machines that powerful. It is prudent to build for lighter machines.
Realistically, a developer can deliver Forms under Windows 3.11 to machines with as little as 8MB of RAM if they conform to the protocols listed below. Any reasonable application, however, needs 12 MB; and 16MB is even more desirable. Also, the client doesn’t necessarily need particularly powerful machines for running the application. 33 or 66 Mhz is powerful enough to support carefully written Forms applications.
Developers should keep in mind the following advice:
c) Hard Disk Requirements:
Forms takes up 20 MB of hard disk space. At run time, to deliver an executable form needs approximately 50-300K per form. Even a big application with 100 forms won’t take up more than 10MB. Also, a big Windows swap file should be factored into system hard disk requirements. 30-40 MB free on the machine should be sufficient.
II) Requirements for the Developer:
a) Monitors: The user needs to have monitors with sufficient resources running at least the same or higher resolution than the ones the system is being built for. The monitor needs to have appropriate colors for the applications. If developers are building in 256 colors and the user only has 16, outputs may be unreadable. This should be tested before development proceeds.
b) Memory, Machines and Hard Disk Requirements:
In a client/server set up, a full version of Forms will take up 40 MB. Reports uses another 40 MB and graphics about 30MB. Also, if a lot of versioning is done in development, .fmb files are about three times as large as .fmx files. A complex form takes up 1 MB. If the user is historically storing versions, 10-20 MB of space per form should be allocated during development. With hard disk prices as low as they are, this is usually not a big problem. However, a minimum of 500 MB is a reasonable amount of development space to allocate. 1 GB is optimal.
For the developer using a stand alone system, the absolute minimum requirements are a 90Mhz Pentium and 32 MB of main memory. Personal Oracle takes up 50 MB. Unless the developer is working on a very large database, the initial overhead is small - about 50 MB. Oracle Light does not have sufficient features for development environments.
6) Maximizing Use of Screen Real Estate
Conservation of screen real estate is extremely important. Screen real estate is the designer’s most precious commodity. It is very easy to waste screen space by not thinking about the layout of the application. The best way to minimize wasted screen space is to think carefully about every pixel.
For example, in a multi-record block, don't put any pixels between fields. Start at the top and fill the screen up one layer at a time. Each block or area should be laid out horizontally in order to maximize the use of screen space.
Some suggestions for making the most of screen space include:
Buttons:
Buttons shouldn’t be any bigger than necessary. They need to display the button label with a few extra pixels on each side. A row of buttons don’t all need to be the same size. For example, an "Exit" button doesn’t need to be as large as an "Execute Query" button. In a multi-record block, displaying 3 records could be redesigned to display 5 instead. This means getting a good deal more information on the screen. User input is very important in doing screen design. Use this input and go back to the Layout Editor to move things around as needed.
Putting buttons across the bottom of the screen wastes less vertical space. Standard buttons take up 17 pixels. If buttons need to be placed vertically on the left side of the screen, a good Strategy is to stack them next to their associated field.
Buttons are most often placed at the top or bottom of a screen. Other, creative solutions are possible such as placing buttons in a horizontal row in the middle of the screen. Placement is more appropriate for easy use; and the center row of buttons makes a natural divider for the screen.
Pop-Lists:
Pop lists are a major space saving device. Only one record needs to be displayed space-wise when a pop-list is used. The pop-list will then show as many records as needed when selected. Two hundred records is a practical limit for pop-lists. A user does not want to have to scroll through a list much longer than this. However, there is a cheat for this problem. If there are too many records to go into a pop-list, an LOV can be used as an even better search facility. The idea is to have a little button that brings up the LOV.
Super Button:
A "super button" is a button that performs more than one function. You can make a gray pop-list that looks like a button. This does what a button would do, i.e. generate the pop-list.
Logos:
In general, logos and fancy graphics are usually unnecessary. They take up a lot of space and have very little use. Logos are not needed for internal forms within organizations. Employees don’t need to see the company logo on every form. For forms going to those outside the company, graphics and logos can be placed on a welcome screen rather than eating up memory, functionality and space on the working forms.
7) Data Validation
There are appropriate values for fields that get put into the database. How is data validation accomplished? It is useful to use the following taxonomy for data validation:
I) Client-side validation
II) Server-side validation
III) Client and server side validation
Within each of these categories, there are two types of validation:
A) Item-level (self-contained) validation occurs within the record.
Examples of this type include:
a) required fields
b) data type
c) range of values
d) format mask
B) Contingent validation
Examples of this type include:
a) within record validation
b) referential integrity
c) complex validation
Required fields: Server-side validation
When inserting a record into the database, the required field record cannot be null. Typically this becomes a validation type trigger on the database. If validation is on the server side, the user gets no feedback that modification is invalid until that record is posted to the database. A message is then returned declaring the posting invalid. If this posting occurred as a result of a commit, the commit fails and all records that are being posted are rolled back.
There are several advantages to server-side validation. First, the database is protected from invalid data entry independent of the application. Second, the database is protected from errors in applications. Users are prevented from making modifications with their own applications and corrupting the database. Validation in no way prevents irrational, irrelevant or inaccurate data entry but will prevent occurrences such as entering purchase details without an existing purchase order.
The disadvantage to server-side validation is that it can slow down inserts/updates/deletes to the database since validation must be checked when data is being put in.
A required field trigger on the database requires almost no overhead. Declaring that a field is required should always, but not only, be done at the database level. It should also be done on the client-side. Traditionally, in Forms Version 3 and other earlier character based applications, required field validation was done when a user attempted to leave a
field. It made sense to force a required field in these character based form environments. However, this makes no sense in a GUI environment. The user may want to click somewhere else and there is no good way to specify to the user when a field must be entered.
Where does it make sense to validate a required field? Writing PRE_INSERT and PRE_UPDATE triggers at the block level will force the user to enter the required fields before leaving the active block. Remember not to ever set the property "required field" to be true on an item.
Required field validation can be genericized within the template so that all the user has to do is specify what the required fields are in a package variable Required field validation then occurs with no network traffic and no server side activity. The activity is all on the client side.
Client-side validation:
The advantages to required field validation on the client side are no network or server side traffic. The problem is that this validation is difficult to genericize. It must be set up for each application by rewriting the appropriate triggers in a potentially different way. The only way to genericize all data validation on the client side is to write a routine to extract all the validation information from the server side. Then a place must be created to store the client-side validation rules which generically invoke those validation routines on PRE_INSERT, UPDATE and DELETE triggers.
Of course, some validation information, by its nature, cannot be client side. For example, foreign key lookups require a database lookup. However, these tables can be stored locally at the client-side.
Problems with client side validation occur in a volatile database. How does the user know that the underlying server information hasn’t changed since the last use? There is always the hazard that the data on the server side can change between query and validation. This is one reason that server side data validation constraints are so important. For example, if a user brings up a PO to do allocations and someone else modifies the PO in the meantime, the database can detect the invalid allocation and prevent insertion of information which corrupts the integrity of the database. Another alternative for handling this problem is to lock the information using the SELECT_FOR_UPDATE command or some other explicit locking mechanism. If the situation arises that the user view is out of date, an appropriate signal should be given to the user that the information is not accurate.
Data type:
By declaring one of the data types on a field (character, number, date) the user will get some level of validation. By doing nothing more than specifying the type, the user will get an underlying Form error message. The designer can override this behavior using an ON_ERROR trigger.
Range of Values:
High/low value can be specified as properties. The use of these values prevents the user from entering data outside of these ranges. This works for all three data types (character, number and date.) Note: there is a default hierarchy for the data types: numbers, upper case letters, lower case letters). For example, if the range were from M-d, this would include the letters M-Z and a-d. This type of validation occurs as the data is entered which is appropriate for these values, unlike those in required fields. However, the default error messages are not useful. The designer may want to override these using an ON_ERROR trigger at the form level.
Format Mask:
A format mask defines the legal characters that can be entered in the field. It will also format the display of data in a field, i.e. date/money. This feature looks useful and works well but not always in the way it was intended. It can make fields more restricted than is desired. Format mask works well on entry; but on update, when the user tries to insert a new character on the format mask field, it won’t always allow this. Format masks are very restrictive since they force entries character by character.
Contingent Validation:
Contingent validation occurs when one field is dependent upon the information entered in another field.
Within record validation: In this case, no information is fetched from the database to bring up the record. For example, on an employee record, an end date cannot occur before a begin date. The traditional way to handle this is an ON_VALIDATE trigger. This can be annoying if there is a need to switch from one date range to another. These kinds of restrictions should be placed in PRE_INSERT/PRE_UPDATE triggers. For example, in entering names, the user cannot insert a middle name unless there is a last name. This prevents errors in the event that there is no middle name. Another example might be the amount of a purchase order issued by a particular individual which is dependent upon his/her level of authorization. Again, the code to handle this should be added to the PRE_INSERT and PRE_UPDATE triggers.
Contingent validation may need to be performed on something outside the item’s record and may require database access.
Referential Integrity: This means enforcing that a foreign key value appears in the master table. This does not necessarily require a database lookup.
There are several ways to enforce referential integrity:
a) Master Detail block - Since the master block is already selected, on entry, the details will already be based on the master block value. By having master/detail blocks, referential integrity violation is prevented in principle.
b) In the Department/Employee table example, if it is necessary to insert employees and select from departments, this can be done by populating a pop-list using record groups or with an LOV to prevent the user from selecting invalid values.
c) The system can allow the user to type in a value while a trigger looks up the value in a record group.
d) Execute a query to the database to validate that the entry is appropriate.
e) Do nothing. If referential integrity exists at the database level, if the entered value is invalid, the insertion or update will fail.
Complex Validation: This category consists of any other type of validation outside of the other types. For example, if a purchase order (PO) has many line item details and it is possible to independently allocate money from the PO to various expense accounts, these may not match. This will have to be handled creatively on a case-specific basis. In the example above, the user could bring up the purchase order and details as they do allocations against an open PO. This way, the user has all the relevant information at their fingertips. The designer needs to look at the business rule being validated and figure out the most efficient way possible to handle the validation.
The best overall strategy is to enforce all data validation on the server side for safety and on the client side for performance. There must be a balance between enforcing the integrity of the database and preventing useful work from being done in an organization due to performance slowdowns. If the system is a high volume one in a many user environment, it may be necessary to disable some validation at server side to decrease the load on the server. But, it practice, I have never seen this occur. I strongly recommend that all data validation rules exist on both the client and server sides.
8) Where To Put Code
Where to Put Code in a Client/Server Application
When you write PL/SQL code for your forms applications, you have to decide where to place it. There are two issues to address in determining where to put the code: the macro and the micro issues.
The Macro Issue
The macro issue is whether to put the code on the server side (as PL/SQL packages, procedures, functions and triggers created in the database) or on the client side (within Forms). The answer to this follows the 3-C rule:
Code Close to the CPU
In other words, determine which side of the client-server model will do the processing and put the code there. If your code accesses server objects, it makes more sense to have it execute on the server’s CPU. In this situation, you would call the server code from the client which greatly reduces the network traffic created by sending blocks of PL/SQL code or large SQL statements to the server. However, if you are doing processes in the code that manipulate client-side objects or that the client CPU can possibly do to save network calls to the server, the code should execute on the client machine’s CPU. You do this by using the Forms PL/SQL and placing code in the form or its attached libraries. Since Forms has its own PL/SQL interpreter, any code you write that does not need to access server objects, will not bother the RDBMS for that processing.
Therefore, in general, put code on the server side that accesses server objects and put code on the client side to access and manipulate client objects.
The Micro Issue
Once you have decided where the code shall be stored and executed, you have to decide where in Forms to place the client-side code. There are three places to put PL/SQL code in a form or menu module: PL/SQL Units, Libraries, Triggers.
Packages:
The best method is to keep all code in PL/SQL packages and call the packaged procedures, functions and variables from your triggers. This hides some of the internal processing code you write in the PL/SQL blocks and provides a clean and consistent interface to the code you write. Triggers will call this code as will other procedures and functions in other packages. One strategy is to keep the packages locally in the form you are working on. When the code is working satisfactorily, move it to a PL/SQL library if it can be used in other forms. Then delete the local code and be sure the library is saved and attached to the form.
One of the benefits to packages is that they give you the capability to store variable values between triggers by using package variables. Another benefit is that the calling interface can help to categorize the code you use. For example, you could have a package of procedures for calling WinHelp and call this FP_WIN_HELP (Forms Package for WinHelp). This package could have a package specification that stores the name of the help file you will be calling. All procedures in this package as well as in other packages will be able to use the packaged variable. In addition, you would place all procedures and functions in that package that deal with calling Windows Help. Thus, when you need to find a particular piece of PL/SQL code, you can look in the parent (package) and find the child procedure or function. In other words, it creates a kind of two-tiered hierarchy. It also makes your code easier to search in because there will be descriptively named sets of procedures and functions.
Libraries:
When you move code to the library, that code will be available to any form to which you attach it. If the library code changes, the form attaching that code will not need to be touched and the new code will take effect automatically. Libraries reduce the amount of local code and make the finished form a bit smaller.
Calling Packaged Code from a Trigger:
Remember that, even if you use a procedure in a trigger, the code that is executed acts as if it had been written in the trigger itself. Therefore, you would need appropriate exception handlers in the trigger or in the procedure as if the PL/SQL block was part of the trigger code. For example, you have a trigger that calls 3 procedures:
ProcA;
ProcB;
ProcC;
Say you raise an exception implicitly or explicitly or with "raise form_trigger_failure." If ProcA has an exception section that handles these exceptions and you want the trigger itself to stop, you want to be sure the ProcA exception ends with:
raise form_trigger_failure;
Otherwise, the trigger will proceed to ProcB and ProcC because the exception in ProcA was handled satisfactorily.
Where to use the packages:
A good style to use is to attach the library to the form and do as little local PL/SQL as you can to make use of the library concept.
All menu items should call either user-defined or Oracle-defined built-ins. For example, the menu has an item for deleting a record. This menu item calls a user-defined package in Forms that has the actual code. In addition, other standard Forms functions like "Enter Query" and "Exit Form" should call the code using do_key(the_parameter). This will cause the key trigger to fire so you could standardize the locations of your code and be sure the same piece fired whether the user selected a menu item, pressed a toolbar button, or pressed the actual function key.
In summary, here is a chart that shows where the client-side code should be. It shows the various positions for an Exit Form function.
| Key press (Ctrl-Q) | KEY-EXIT trigger. This would call a package procedure TOOLBAR.EXITFORM. |
| Menu item (File-Exit) | do_key(‘exit_form’); This would fire the key trigger mentioned above. |
| Toolbar button | WHEN-BUTTON-PRESSED trigger calls the key trigger above. |
| Toolbar PL/SQL package | A procedure in this package that does everything you need to do to exit the form and then exits the form. |
Which Level of Trigger?
The decision as to which level ¾ form, block, item ¾ to place the trigger is also worth some discussion. If possible, it is best to avoid item level triggers such as single WHEN-BUTTON-PRESSED triggers. This trigger could be easily placed on the block level and all code needed for all buttons placed in a single packaged procedure. This makes changing the code much easier because you can just open up one package and edit all buttons at once. The alternative (individual button triggers) would require a lot of work opening and closing nodes on the Object Navigator to find the correct procedure.
You can define a trigger on an upper level and then code one on a lower level. An example of this is on an item level WHEN-BUTTON-PRESSED when there is already one on the block level. The lower level code takes precedence unless you set the Execution Style property on the lower trigger’s properties to Before or After.
9) Toolbar Tips
The main idea on a toolbar is that you want to have the most commonly used functionality associated with the toolbar icons. Practically, you can only fit 10-20 icons on a toolbar so they must be selected carefully.
Toolbars should be iconic with pop-up help. Pop-up help is easily implemented using Oracle’s foreign function interface and the showhint.dll.
The icons selected should be associated with functions that are consistent with the way the user, not the developer, thinks about the application. Therefore, icons such as "previous block" and "next block" have no place on the toolbar. The toolbar icons that I use are: Open, Delete, Save, Print, Back to Main Menu, Exit, Query, Find, Help, Duplicate.
10) Menu Tips
Getting good advice on how to build a correct menu is hard to come by. This is not a trivial task. The problem is that menus have very complete functionality. The developer needs to think of all the types of functions that might exist for the user. For example, in a hypothetical standard employee application, one menu choice might be File/delete. This may sound straightforward but what does this File/delete option really do?
The user may want to any one of the following:
It makes no sense to give the user such broad functionality in a tool bar; but it does make sense for a menu. The right way to do this is to come up with all the appropriate functionalities which the form menu can deliver to the application. Give the user complete functionality. Don’t make menus too deep. At most, a menu should have 3 levels of drop-downs.
The basic menu should be the same for each application and correspond to standard Windows names where possible. For example, most users when dealing with records and databases think in terms of files and not records. Therefore, putting functionality under File/Insert or File/Delete should correspond to the user’s expectations. In generating menus, use basic Windows titles (File, Edit, etc.).
The biggest problem with menus is figuring out what to put in them. The design philosophy I like to use is the following: The toolbar includes the most common functions for the applications. It changes very little from form to form. Menus, by contract, have every function available to the user in them (including the toolbar functions). They change quite drastically from form to form.
Menu Design Strategy:
The first thing to do when starting to design a menu module is to strategize what functions you will offer on the menu. In this stage, you determine only which items will be in the menu, not necessarily how it will look. This is actually an important first step because you are deciding and planning how users will work with your application. You will answer questions at this stage that deal with the activities in your application. Questions you might ask include:
Notice that many of these questions are basic things that a GUI user will take for granted and may well be the default behavior in Forms. You still need to ask the questions so you can take control over and provide reasons for all that the user can do in your application. In addition, you need to consider the categories of items above and which specific items are appropriate for your system. You may have other considerations for your application, but these questions and decisions are necessary so your menu will be of the most use. A helpful way to do this is to have a brainstorming session (where no suggestion is too trivial) with other developers or, even knowledgeable users, to determine the questions and even the answers that apply to the menu items.
11) Tabs
Tabs are a very efficient way to handle complex forms. They effectively increase the usable space on the screen many times over. The questions is how to implement them. In Forms 5.0, tab objects are native in the product and trivial to use. It is perhaps the best implementation of tabs that I’ve seen in any product. However, until version 5.0 is released and stable, we have to use some other facility to support tabs.
There are two approaches that have been used:
For a number of reasons, I do not advocate the VBX approach. First, VBXs are not supported outside of the Windows environment. Second, VBXs require using a non-Oracle product. If problems arise, vendors will point fingers at each other for the source of the problem. Finally, it is just as easy to build tabs without VBX.
The way I build my tabs is to use the tab objects supplied by Oracle with the product. I don’t use any of the functionality triggers but I like how these tabs were drawn. I then take the tab objects and add display items to them which act as the tab labels. Next, I add simple code to the tab labels to manipulate the associated stacked canvases to create the action of a tab form. One of the best aspects of this approach is that I can use a horizontal multi-record form for my tab field, thereby creating scrolling tabs.
Once you have built a set of tabs, place them on a small stacked canvas so that they can be easily transported between applications. I actually have three tab canvases - small, medium and large - that can be revised for all applications.
12) Passing Parameters to Other Forms and Reports
Getting information between applications is a relatively straightforward process. I use a very simple procedure. Developer/2000 includes the concept of a parameter list where you can pass the contents of a record simultaneously to another form or report. However, if you try to create a parameter list that already exists, you will get an error message. Likewise, if you try to delete a parameter list that does not exist, an error will occur. It is necessary to check to see if a parameter form exists.
When using a parameter in a form, to avoid these problems, I create a parameter list and add all necessary parameters to the list with default values. Then, when I need to invoke the parameter list, I reassign the values and pass the parameter list to the form or report. These parameters are always passed as text.
13) New Form/Call Form/Open Form
There are three ways to call forms from other forms using built-in procedures. All three allow you to supply a parameter list ID as one of the calling parameters so you can pass values to the second form.
CALL_FORM
Call_form will call FormB from FormA but leave FormA in memory so that when FormB is exited, control will pass back to FormA. Both forms use the same database connection session so it is not possible to commit each one separately. When you call FormB, you either have to commit the changes in FormA or when committing FormB, use POST built-in to post the changes to the database. Then you can commit in FormA, which will make the posted changes in FormB permanent as well.
One use for this is in modal forms in which you want to disable the calling form until the called form exits. However, if you allow FormB to do a CALL_FORM back to FormA, the user could get confused and not realize that FormA is already in the stack of forms loaded. The GET_APPLICATION_PROPERTY built-in can derive the calling form’s name if you use CALL_FORM. Also, CALL_FORM is unrestricted so you can call it from POST and PRE triggers. The other two are restricted.
NEW_FORM
NEW_FORM will exit FormA and remove it from memory before calling FormB. This is good if you know you do not want to come back to a particular form because it exits the first form completely. If you did want to return to the calling form, you would have to store the name of the calling form and pass it to the next form. Then you could do a NEW_FORM to return to that first form if needed.
OPEN_FORM
OPEN_FORM is the same as CALL_FORM but has a parameter that lets you open another database session so you can commit FormA and FormB separately.
I almost exclusively use NEW_FORM. This keeps the number of forms open on a particular user’s machine to a minimum. One of the problems that some developers have reported is filling up memory with multiple forms being open simultaneously causing the application to hang or GPF. As a result, I accept the overhead of moving between forms using NEW_FORM to keep the memory requirements to a minimum.
The only exception to this is when a complex form makes a call to a small shared form. For example, I have a bug tracking application that is callable from all forms. I call that application using a CALL_FORM. That way, when I exit the bug tracking form, I return to the original form.
14) How Users can Find Information using Query Mode and Finder Applications
There are two basic ways that users can find the information they need. The first is by using Oracle’s query mode within the application. The second is to have a dedicated finder application specifically built to help users find information. Oracle’s query mode is already familiar to many of us. However, a few things have to be kept in mind with GUI applications in query mode:
15) Big or Little Forms - How many canvases is too many?
After having built several forms whose .fmb is greater than 1MB without using any graphical objects, I’m convinced that Oracle does not do extensive stress testing on forms that large. The number of GPFs and otherwise erratic behavior increases dramatically for large forms. With very large forms, you may encounter buttons that magically lose their triggers. Also, if you connect to the database before opening the form, it will GPF.
With large forms, you may also have more difficulty in managing the development environment. With any more variables and program units, it becomes more confusing and less comfortable to work in that environment. Therefore, the solution is to keep your forms relatively small. Anything over five or six blocks and/or canvases is not recommended for the reasons stated above.
16) Object Libraries
As mentioned in the Tabs tip, I have stacked canvases set up for easy reuse. Where are these stacked canvases stored? I create a special object library form where I create an object group for each of the stacked canvases. Each group includes the canvas, associated objects and triggers. Then, when I want to use a tab in a form, I simply open the object library form and copy the tab canvas into the new application.
Other useful structures to put in object library forms include: rarely used specialized property classes, complex trigger code examples (for example, parameter list construction) infrequently used alerts and complex graphic objects.
This feature of having a special object library is native in Forms 5.0.
17) Referenced Objects
A referenced object is an image of an object from another form. It inherits all the properties of that object. If that object changes, all changes will be reflected in the referenced object.
Currently, in Forms 4.5, referenced objects cannot be changed. The only effect you can have is to delete a portion. For example, if you have referenced a block, you can delete an item on the block but you cannot change any properties on the block. Unfortunately, Forms suffers from no such restriction. For example using Layout Editor, you can inadvertently add an object to a referenced block but you cannot manipulate it. If a canvas is referenced, Forms can automatically resize the canvas to accommodate created blocks but you can’t re-modify the canvas size. As a result, referenced objects have limited usefulness.
My main use of referenced objects is with property classes. They are the underlying default definitions of objects that should all be stored in a central repository. Referencing these objects is very effective. However, in Forms 5.0, referenced objects can have their properties changed. With this change, it may be that you will want to reference many objects from one form to another because the properties can be overwritten. As soon as Forms 5.0 becomes available, the referenced objects feature will be increasingly more useful.
Un-tips - Don’t believe everything you read. Conventional wisdom is frequently wrong.
18) Un-tip -- Use Item IDs for everything
Screen fields are frequently referenced in applications. References to item IDs are, on average) about 25% faster than calls to named objects. However, if you are only making a single call to the object, you had to write twice as much code to accomplish the same thing and it will run SLOWER (by a little).
If you are going to reset a bunch of properties for an object, use the ID. Otherwise, use the name.
If you could read or assign a value to a screen object, then you could use IDs to speed up looping through all records in a block. Unfortunately, you can’t do that.
19) Un-tip -- You can convert 3.0 applications to 4.5
GUI development is inherently different from character development. There are few similarities in application design. Navigation, validation, and screen layout are all completely different. For your complex applications, you will have to rethink them from the ground up.
20) Un-tip -- From a GUI perspective, you can do anything a user can imagine
Forms, like every 4GL, has serious limitations. If you make your form work the way that the builders of Developer/2000 at Oracle think that forms should be built, then Forms will greatly enhance your productivity.
If, however, you like to march to the tune of a different drummer and insist on subtle changes in the way that your forms work, then you can be in real trouble.
For example, back in the days of Forms 4.0, I worked on a project where the lead developer wanted a scrolling button bar. The bar supported perhaps 5 buttons on the screen but they needed to be able to support 10 or more buttons. They implemented it using a canvas.
Conclusion
In this paper, I have presented a few hopefully helpful tips. If you have tips of your own or comments on anything in this paper, please e-mail the author at : pdorsey.dulcian@att.worldnet.net.